Nginx
# 介绍
# Nginx是什么
Nginx is an HTTP and reverse proxy server, a mail proxy server, and a generic TCP/UDP proxy server。
Nginx是HTTP和反向代理服务器、邮件代理服务器和通用TCP/UDP代理服务器
# 优点
# 1. 高并发,高性能
# 2. 可拓展性好
# 3. 高可靠性
# 4. 热部署
# 5.BSD许可证
# 我们能用来干什么
# ——反向代理
# ——负载均衡
# ——HTTP服务器(动静分离)
# 起步
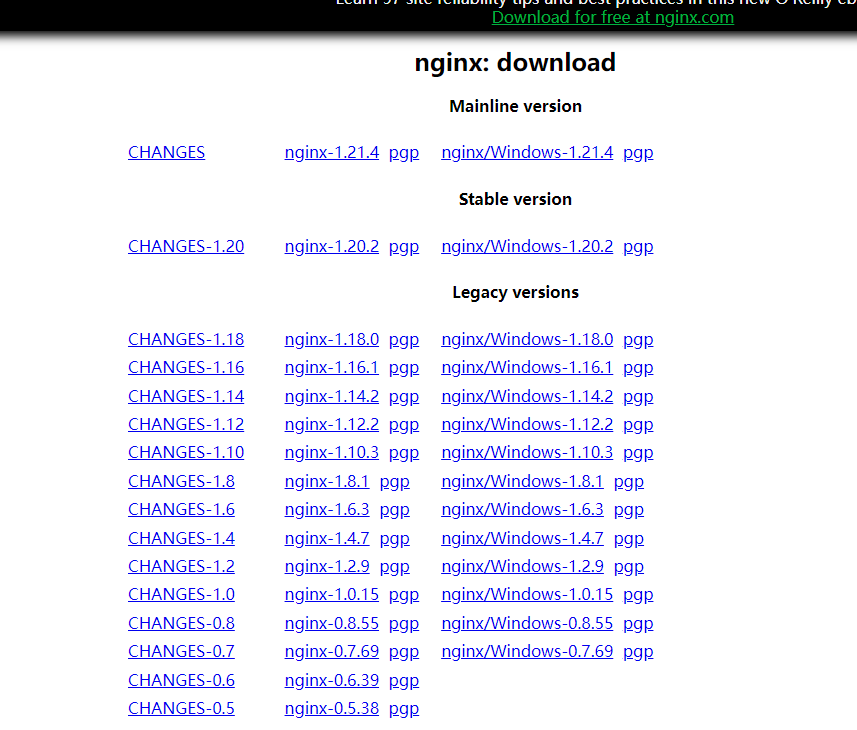
# 安装
点击网址去官网下载:
http://nginx.org/en/download.html (opens new window)
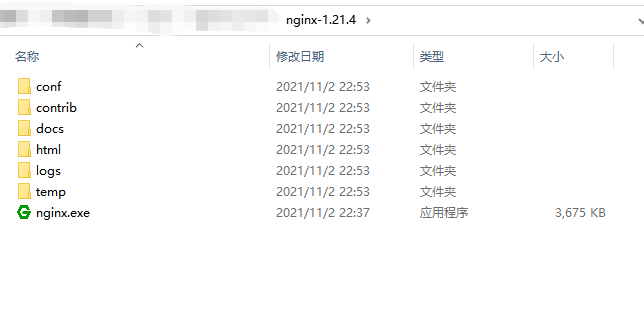
解压到磁盘即可安装
# 启动
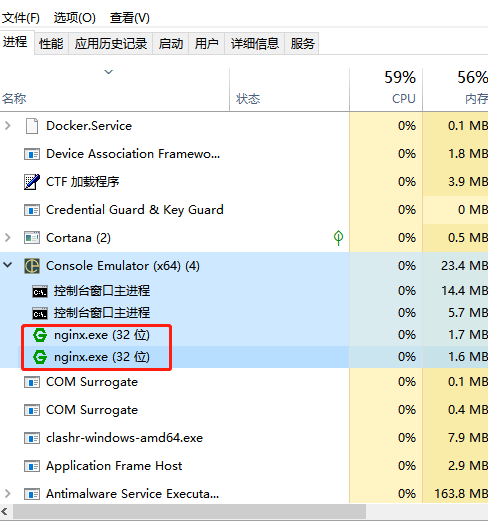
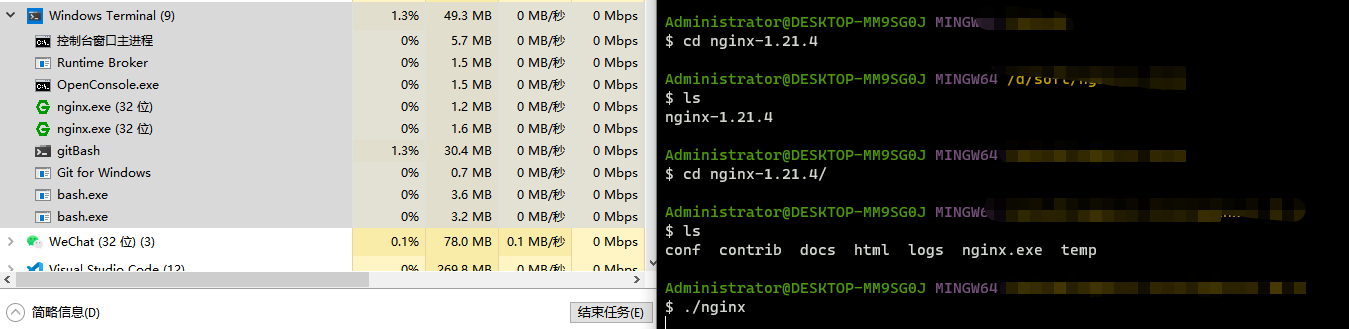
双击nginx.exe
在任务管理器中可以找到nginx的两个进程,即是启动成功。
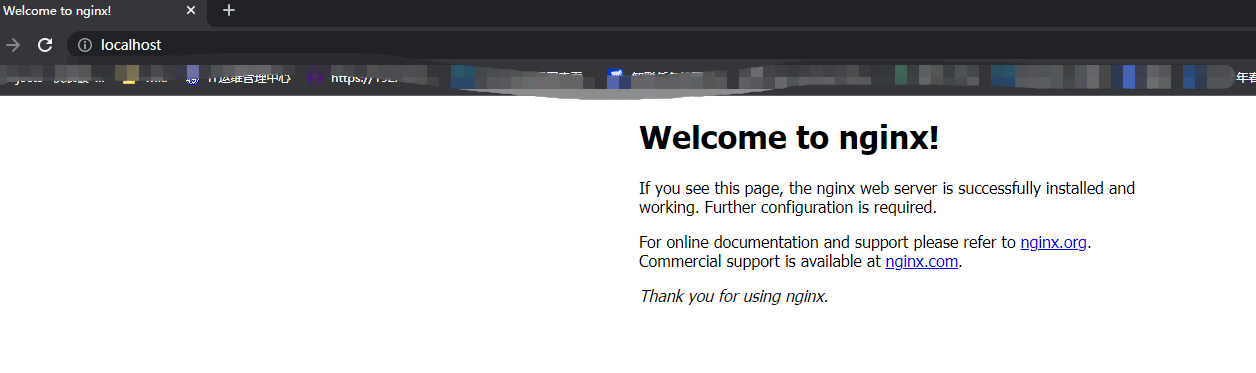
打开网址 http://localhost/如果出现以下页面,即表示启动成功。
# 部署静态网页
打开vscode简单的新建一个testNg.html
内容如下:
<!DOCTYPE html>
<html lang="en">
<head>
    <meta charset="UTF-8">
    <meta http-equiv="X-UA-Compatible" content="IE=edge">
    <meta name="viewport" content="width=device-width, initial-scale=1.0">
    <title>Hello Nginx</title>
</head>
<body>
    Hi ,this is an  test page of nginx.
    <br/>
    I am a static page.
</body>
</html>
2
3
4
5
6
7
8
9
10
11
12
13
14
将此页面复制到nginx的html目录即可
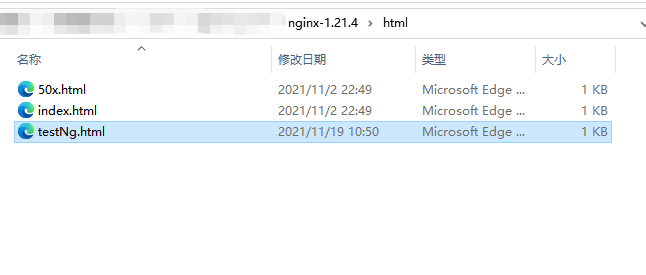
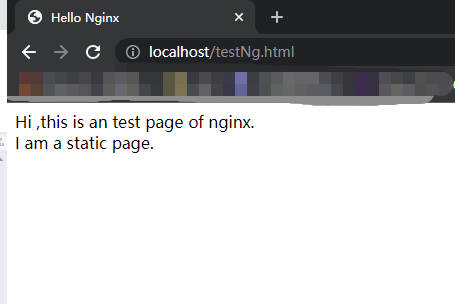
打开浏览器,输入 http://localhost/testNg.html (opens new window)
显示如下:
# 深入了解nginx
# 目录介绍
Nginx-
|_ conf **** 配置目录
|_ contrib
|_ docs 文档目录
|_ logs **** 日志目录
|_ temp 临时文件目录
|_ html 静态页面目录
|_ nginx.exe 主程序
# 常用的命令
进入nginx目录执行
# 1. ./nginx 启动
# 2. ./nginx -s stop 停止nginx
# 3. ./nginx -t 测试配置文件 修改完配置文件一定要先测试在执行reload命令!!!
# 4. ./nginx -s reload 重新加载nginx,这个一般是修改完配置文件需要执行。
# 配置文件介绍
这里仅介绍nginx.conf其他配置文件一般不需要修改,有兴趣的同学可以课下自行研究。
进入conf目录打开nginx.conf(每次修改前最好备份一下,避免改完不可用,造成不必要的麻烦)
    #nginx 的工作进程数

    worker\_processes  10;

    #nginx 服务器与用户的网络连接

    events {

        #最大连接数

        worker\_connections  1024;

    }

    #web服务

    http {

        #导入媒体类型

        include       mime.types;

        default\_type  application/octet-stream;

        sendfile        on;

        keepalive\_timeout  65;

        #服务配置

        server {

            #端口

            listen       80;

            #域名

            server\_name  localhost;

            #路由

            location / {

                #根目录

                root   html;

                #首页

                index  index.html index.htm;

            }

            #错误页面 状态码  +  页面

            error\_page   500 502 503 504  /50x.html;

            #错误页面位置

            location = /50x.html {

                root   html;

            }

        }

    }
2
3
4
5
6
7
8
9
10
11
12
13
14
15
16
17
18
19
20
21
22
23
24
25
26
27
28
29
30
31
32
33
34
35
36
37
38
39
40
41
42
43
44
45
46
47
48
49
50
51
52
53
54
55
56
57
58
59
60
61
62
63
64
65
66
67
68
69
# 反向代理配置
server {

        listen       80;

        server\_name  localhost;

        client\_max\_body\_size 1024M;

        location / {

            proxy\_pass http://localhost:8080;

            proxy\_set\_header Host $host:$server\_port;

        }

}
2
3
4
5
6
7
8
9
10
11
12
13
14
15
16
17
# 负载均衡配置
upstream test {

        server localhost:8080;

        server localhost:8081;

}

server {

  listen       81;

  server\_name  localhost;

  client\_max\_body\_size 1024M;

  location / {

    proxy\_pass http://test;

    proxy\_set\_header Host $host:$server\_port;

  }

}
2
3
4
5
6
7
8
9
10
11
12
13
14
15
16
17
18
19
20
21
22
23
24
25
# HTTP服务器(动静分离)配置
upstream test{

       server localhost:8080;

       server localhost:8081;

    }

    server {

        listen       80;

        server\_name  localhost;

        location / {

            root  html;

            index  index.html;

        }

        # 所有静态请求都由nginx处理,存放目录为html

        location ~ \.(gif|jpg|jpeg|png|bmp|swf|css|js)$ {

            root   html;

        }

        # 所有动态请求都转发给tomcat处理

        location ~ \.(jsp|do)$ {

            proxy\_pass  http://test;

        }

        error\_page   500 502 503 504  /50x.html;

        location = /50x.html {

            root  html;

        }

    }
2
3
4
5
6
7
8
9
10
11
12
13
14
15
16
17
18
19
20
21
22
23
24
25
26
27
28
29
30
31
32
33
34
35
36
37
38
39
40
41
42
43
44
45
46
47
# 实战篇
# 博客系统发布
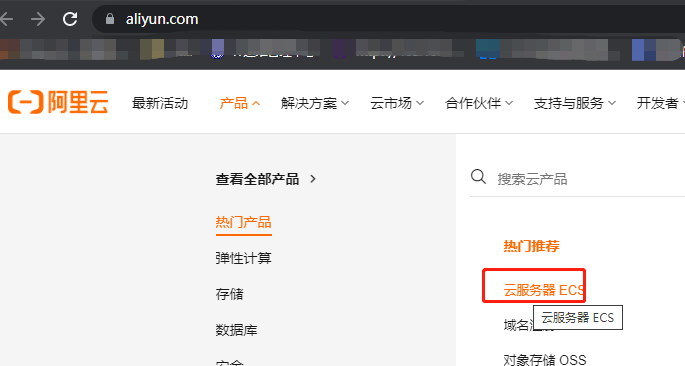
# 1.选择云服务厂商
选择阿里云,理由:起步早,支持完善。
网址 https://www.aliyun.com/
# 2.购买服务器
在产品中找到云服务器ECS,进入购买页面,根据提示购买即可
# 3.购买域名并备案
在产品中找到域名注册,进入购买页面,给自己的域名起个名字,查一下是否被占用,如果没有被占用,按照提示购买即可。
# 4.初始化服务器环境
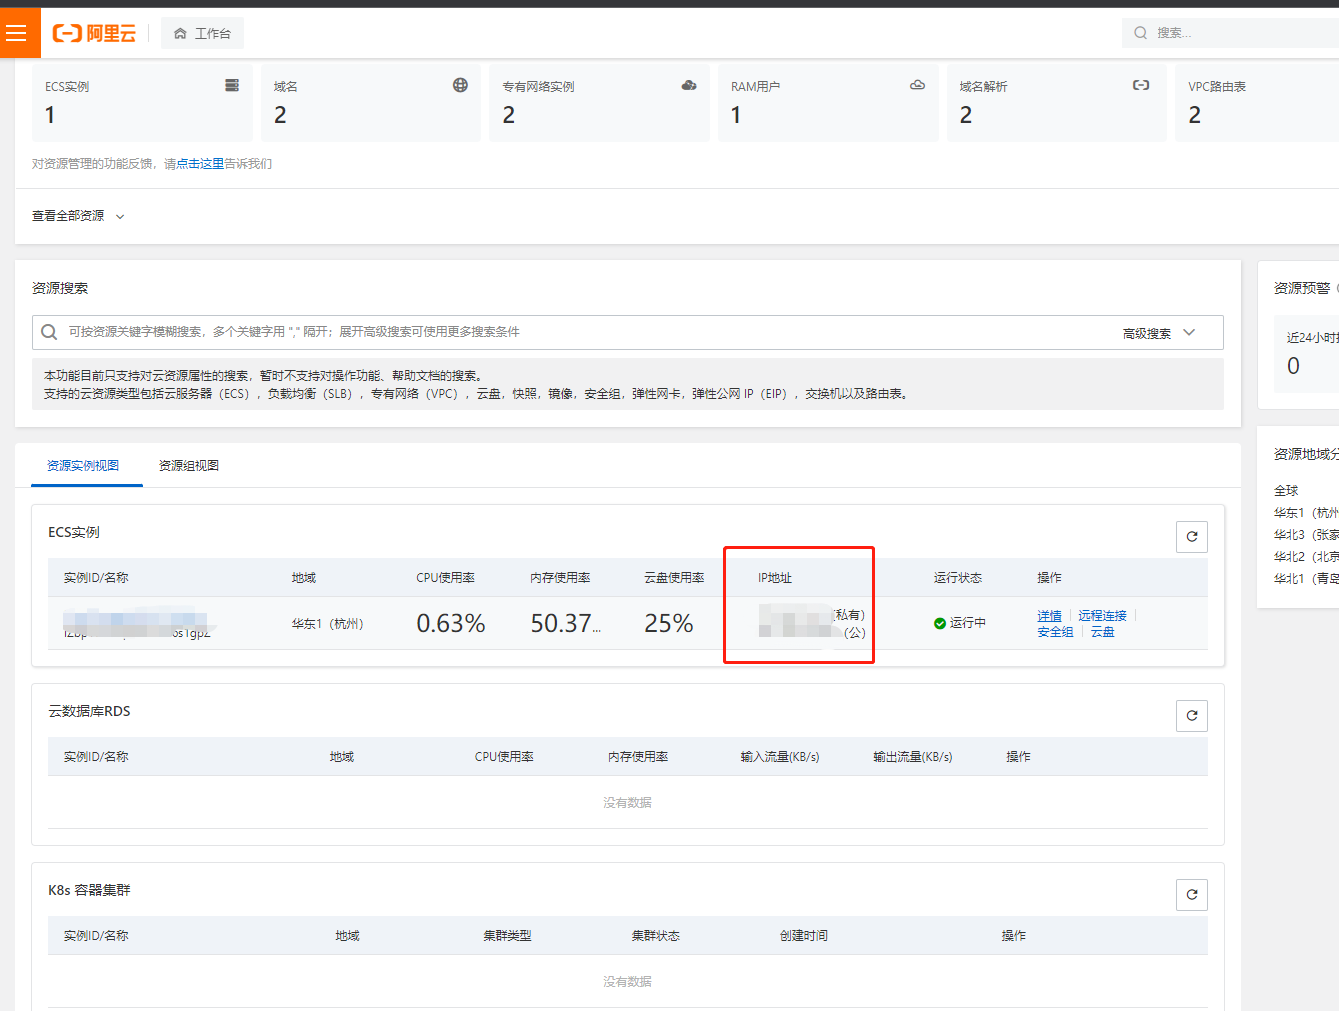
登录web版控制台
https://homenew.console.aliyun.com/home/dashboard/ResourceDashboard (opens new window)
并找到ECS实例的公网ip地址
下载winScp
https://winscp.net/eng/docs/lang:chs
下载putty
https://www.chiark.greenend.org.uk/~sgtatham/putty/
输入公网ip,配置putty&&winScp,并登录

# 1.部署
# 安装linux版的nginx(推荐使用下载压缩包的方式)
请参考:
# 1.安装依赖包
sudo yum -y install gcc zlib zlib-devel pcre-devel openssl openssl-devel
# 2.下载并解压安装包
cd /usr/local//下载tar包

sudo wget http://nginx.org/download/nginx-1.18.0.tar.gz

sudo tar -xvf nginx-1.18.0.tar.gz
2
3
4
5
# 3.安装nginx
//进入nginx目录
cd /usr/local/nginx-1.18.0
# 4.编译 make&make install
//执行命令
sudo ./configure

sudo make

sudo make install
2
3
4
5
期间可能会遇到,各种依赖包装不上的问题,请自行百度解决。
# 2.使用winScp找到nginx的安装目录,并切换到html目录
# 3. 将编译好的静态博客文件上传到此目录

此时打开浏览器,输入您的公网ip+目录地址即可测试
http://xxx.xx.xx.xx.x/docs/index.html (opens new window)
# 4. 绑定域名
打开阿里云域名控制台
https://dc.console.aliyun.com/next/index#/domain/list/all-domain
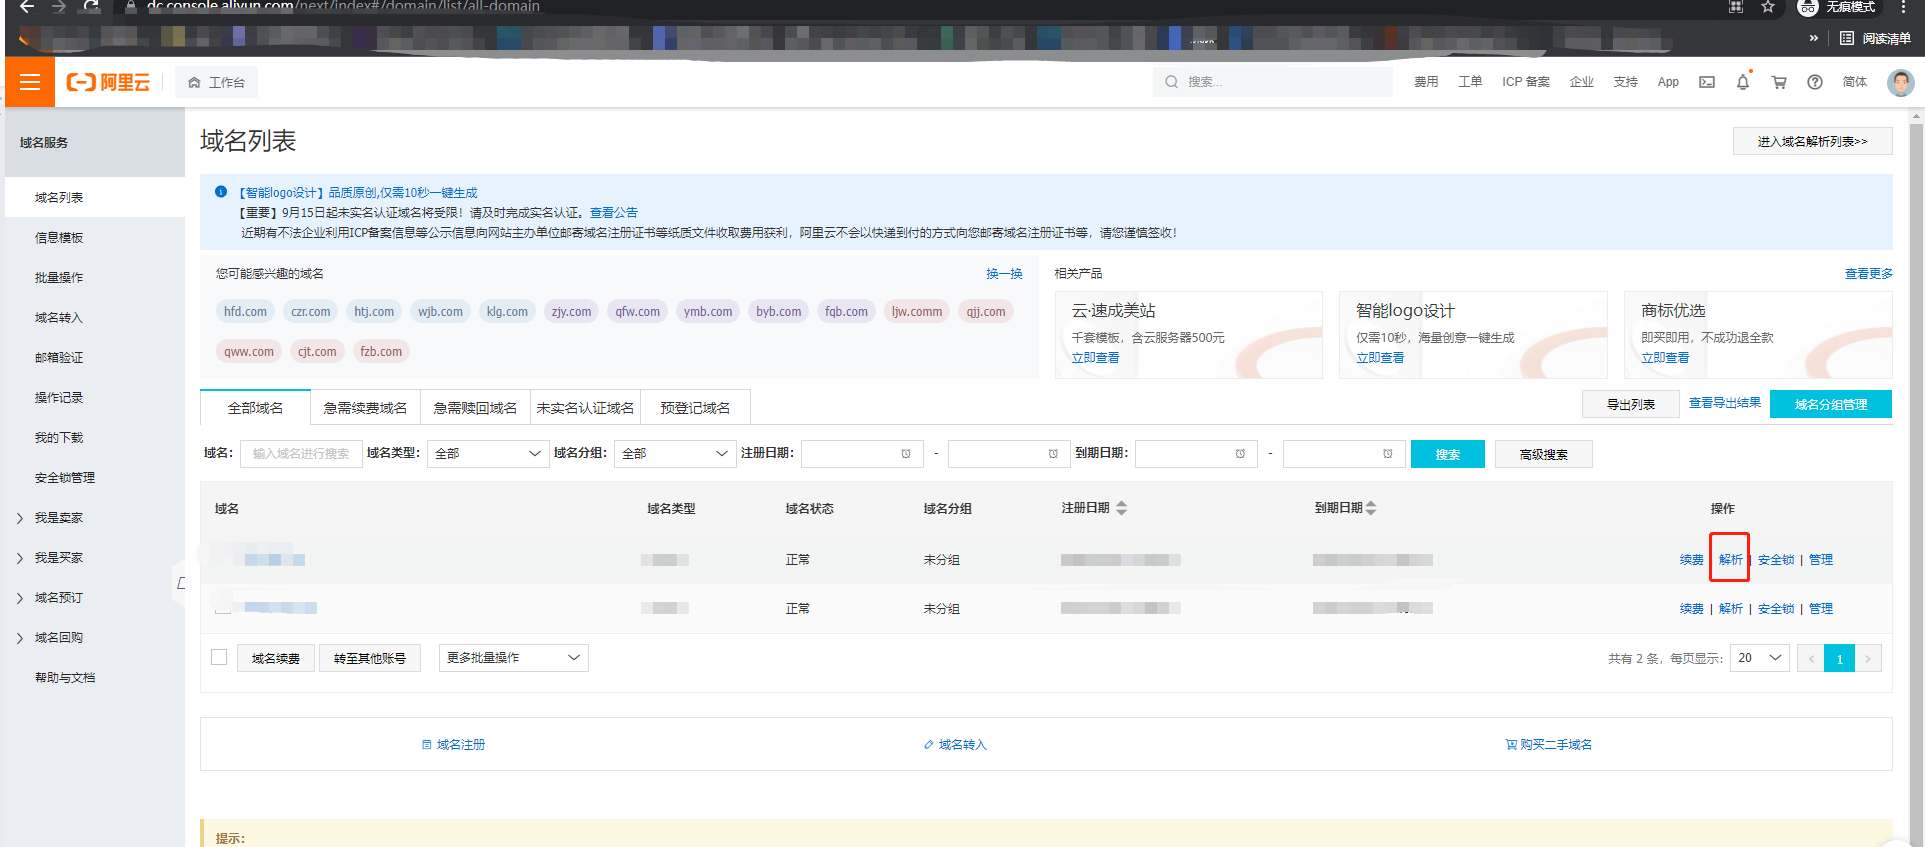
打开解析,增加三种记录,记录值就是您的ESC服务器公网ip
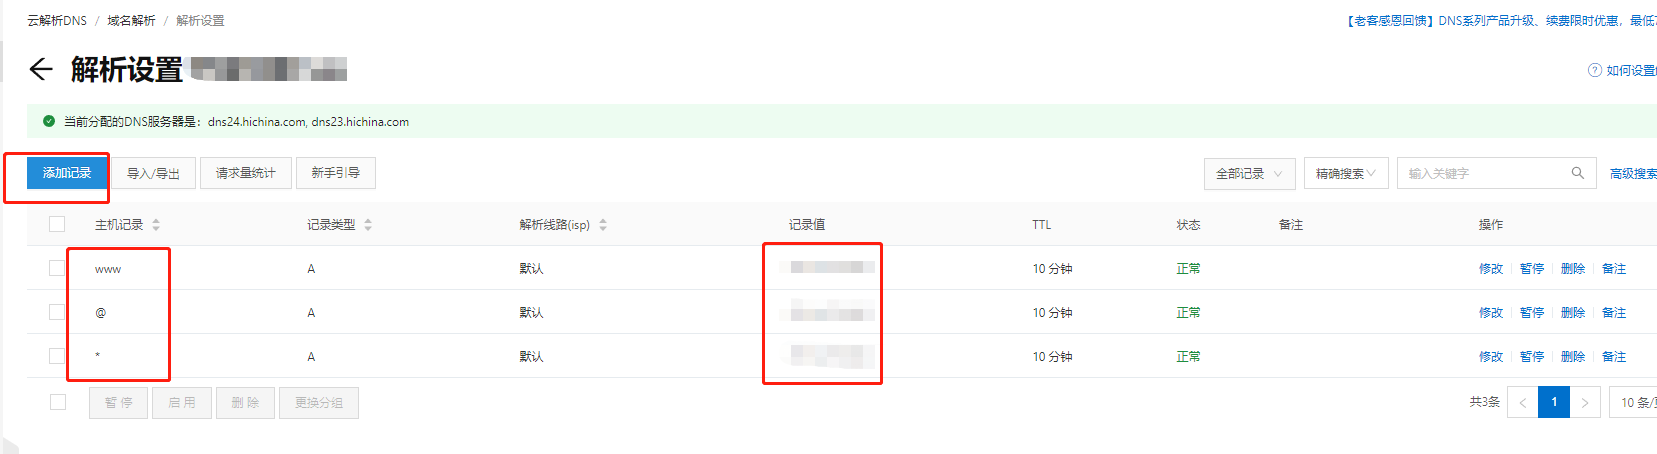
域名如果刚刚购买,需要先备案,才能正常的访问,现在备案只需要再阿里云中根据提示提交材料即可,无需自己去现场备案。
修改nginx配置,挂载域名
在修改server中的server_name,使用命令./nginx -s reload重新加载文件,即可。
      #nginx 的工作进程数

    worker\_processes  10;

    #nginx 服务器与用户的网络连接

    events {

        #最大连接数

        worker\_connections  1024;

    }

    #web服务

    http {

        #导入媒体类型

        include       mime.types;

        default\_type  application/octet-stream;

        sendfile        on;

        keepalive\_timeout  65;

        #服务配置

        server {

            #端口

            listen       80;

            #域名

            server\_name  xxxxx.cn;

            #路由

            location / {

                #根目录

                root   html;

                #首页

                index  index.html index.htm;

            }

            #错误页面 状态码  +  页面

            error\_page   500 502 503 504  /50x.html;

            #错误页面位置

            location = /50x.html {

                root   html;

            }

        }

    }
2
3
4
5
6
7
8
9
10
11
12
13
14
15
16
17
18
19
20
21
22
23
24
25
26
27
28
29
30
31
32
33
34
35
36
37
38
39
40
41
42
43
44
45
46
47
48
49
50
51
52
53
54
55
56
57
58
59
60
61
62
63
64
65
66
67
68
69
# 测试
打开自己的域名